Property pictures will make or break your plans to sell your home as we all know a picture worth a thousand words is worth it. You don’t want to hurry through the planning stage of this process because, unfortunately, many home sellers neglect those important factors.
We’ve all rolled our eyes and shaken our heads in disgust before gazing at images of crappy assets. You may have a beautiful house that looks great in real life and think that is enough to make a good photoshoot, but it’s a little more complicated than that, and several factors come into play.
Here’s our list of 5 important items to consider while planning for a shoot at your house. Check out these below:
1. Plan The Shoot Ahead Of Time
Do not hurry through this stage and take as much time as you need to plan your home for the next photo shoot. You want it to be as close as possible to perfection and you want your home to stand out in the pictures.
Take at least two full days to plan an apartment with one bedroom, and add around 1⁄2 a day per room to ensure you have enough time. If you’re filming a three-bedroom home with a dining room, scheduling a full four days of planning will be your best idea. Of course, this is all in addition to some significant jobs such as painting or bringing in furniture.
2. Don’t Cut Costs On Important Things
Your house, like every other house, might have some problems or items that need to be repaired or repurposed, and you may think it’s okay to leave it for the future owner to look after. However, specifics can make or break a photo shoot, and with just a glimpse, prospective homebuyers will be sure to spot any problems.
Another thing you certainly don’t want to skimp on as part of the sell my house process, on is supplies. We’ve all seen awful photos of property taken in portrait mode with smartphones or with a point-and-shoot camera with the light on. You don’t want to spend all the time planning your home by taking bad pictures just to ruin your chances of selling out.
You may expect that some of your home’s damaged or unattractive areas will show in your listing photographs or be noticed by a prospective buyer, so take the time to patch the kitchen and bathroom tiles, repair electrical sockets, install old rusty doors and not be afraid to repaint. It’s also suggested that you hire an experienced team to clean your hardwood floors. Think of it as an opportunity that’s going to make a huge difference and help you sell your home faster.
3. Declutter The Property And Put Away Personal Items
I think we can all agree no one likes cluttering. Yet no-one wants less clutter than a prospective homebuyer. No one wants to look at pictures of the property that depict a cluttered, dirty, and disorganized home, so they can not imagine living there. You want people to look at your home pictures and be able to put themselves in each room and say, “Wow, I could live there.” That’s why decluttering could be the most important step in your home planning before a photo shoot.
Make sure you get rid of piles of magazines and letters in the living room and put away all kitchen appliances. He also lends a critical tip, one not considered by many. Delete personal images larger than 5×7, as larger photographs can be a nuisance both in person and on the photo page.
You may also want to conceal pictures and personal objects of your family around the building. You want to imagine buyers or landlords living in the room themselves. Stuff from other people may confuse and discourage potential buyers from picturing themselves as homeowners.
Blaise believes that if possible, you can also remove pieces of furniture as this will make your place look bigger and airier. You can also remove all objects in the bathroom, such as toilet paper, toothbrushes, towels, and other things, and make sure the toilet lid is closed.
Cover the sponges, detergent bottles, and dirty dishes swimming in the sink in the kitchen, and delete any stickers, photographs, or sketches of children from the fridge. Hide the cords of your computers and appliances in the living room and bedrooms, straighten your cushions and pillows and smooth out the wrinkles on the sofas or sheets.
Additional things to remember when planning for a photoshoot at your home include getting the garbage out and decluttering the exterior. You don’t want to have vehicles lying around crowding your driveway, or different gardening equipment or toys for children. Also, you want the exterior of the house also to be clean and spruced up. Make sure you are mowing the lawn, sweeping the driveway and patio, and fixing any other problems that might show in the images on the house.
4. Add A Nice Artistic Touch
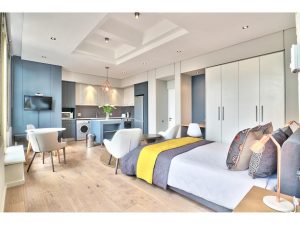
Now that it’s all clean, spruced up, and decluttered in your house, you want to make sure it still has charm and looks like “lived in. You can try adding some touches around the house to achieve that cozy, welcoming atmosphere which translates into images. Consider providing matching pillows for the bedrooms in size, shape, and colour, as it provides a high-end look and adds warmth to the rooms. Try to place fresh flowers in the living room, bedrooms, and bathrooms for a tasteful, stylish touch. Instead of a mixed bouquet try any space with a single variety.
Other sell my home features that can make your home look picture-perfect include candles or warm-light lamps that can add a touch of coziness and make the rooms look even more inviting; coffee table books put in the living room; and carpets or soft blankets. If your home has a fireplace, lighting it up could be a smart idea; that will drive the 10-level coziness factor upwards.
5. Use Light To Best Showcase Your Home
If there is something all interior photographers agree on, it is the value of natural light in photographs of the house. You must present your home in the best light possible. Doing your photoshoot on a sunny day is ideal and getting all your windows and screens washed.
Open all blinds and curtains on the shooting day to let as much natural light in as possible. Often ensure that surfaces are tested for dust. It can also show up in pictures, and that’s not what you want.
You’ll be able to find out the correct time of day to take photos, depending on the location and orientation of your windows. As we said before, avoid shooting in too much direct sunlight and instead aim for soft, indirect light that properly illuminates your rooms and does not lead to over-exposed pictures.